PhotoMerger is a Python + Qt desktop app for merging multiple overlapping photos or scans into one large image. It is designed for cases like scanning an A3 document in several A4 passes, stitching mobile panorama shots, and combining document sections photographed by hand. Free and Open Source.
The app uses OpenCV image processing and multiple alignment strategies so the user can try another method when one algorithm cannot find enough common detail.
Features
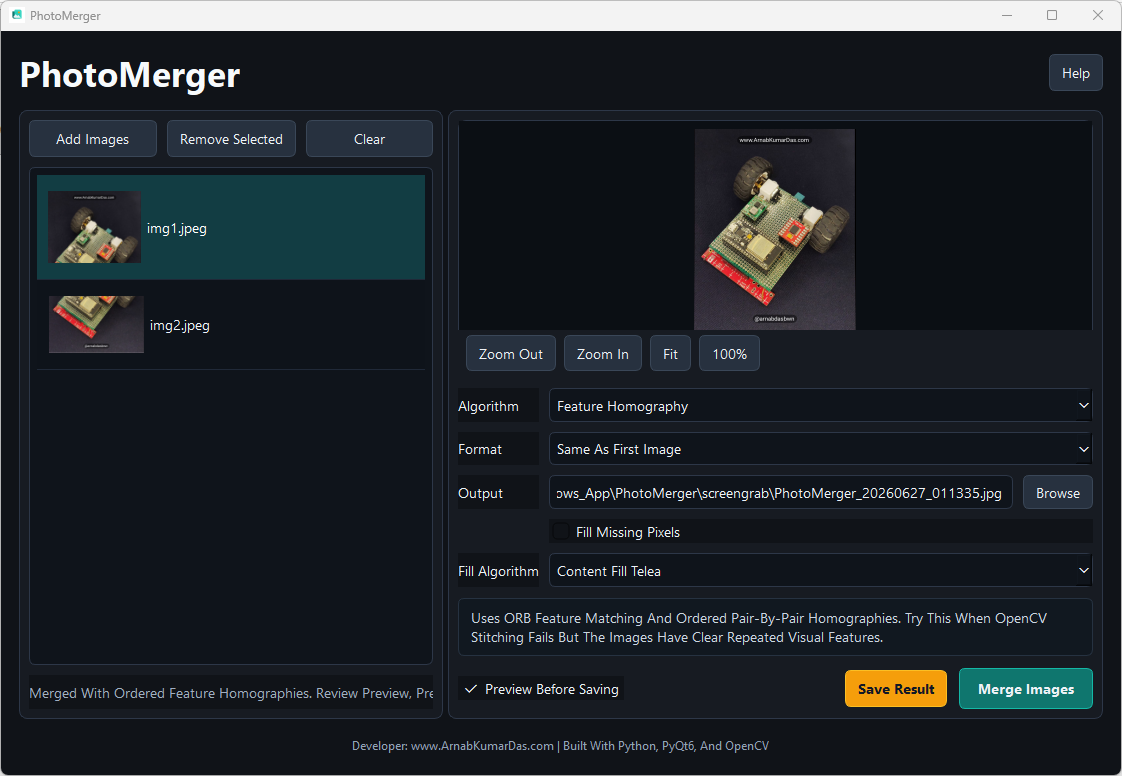
- Modern PyQt6 interface with drag-and-drop input, thumbnails, preview, and progress output.
- Auto-generated output filename in
PhotoMerger_YYYYMMDD_HHMMSSformat, defaulting to the first input image format, with manual filename and export-format overrides. - Scrollable high-quality image preview with zoom buttons, fit-to-window, 100% view, horizontal and vertical scroll bars, and Ctrl + mouse-wheel zoom for input and merged output inspection.
- Optional preview-before-save workflow with a separate Save Result action.
- Busy animation while merge processing is running.
- Save Result highlight after a merge is ready to save.
- Optional missing-pixel fill after merge, with multiple content-fill algorithms for alignment gaps.
- In-app Help window with workflow steps and algorithm usage guidance.
- Multiple merge algorithms:
- OpenCV Panorama Stitcher for mobile and panorama-like captures.
- OpenCV Scan Stitcher for flat documents and scanner captures.
- Feature Homography for difficult ordered overlaps.
- ECC Alignment for small affine corrections when there is enough shared content.
- Template Match Blend for difficult flat scans with visible repeated structure.
- Translation Blend for mostly flat scans with simple displacement.
- Grid Contact Sheet as a fallback layout when images do not overlap enough.
Recommended Workflow
- Add two or more image files using the file picker or drag-and-drop.
- Reorder the files if needed so overlapping scans/photos are in the expected sequence.
- Select a merge algorithm.
- Use Preview Merge to inspect the output before saving.
- If the output has black or empty alignment gaps, enable missing-pixel fill and try a fill algorithm.
- Save the result. By default, the output format follows the first input image format.
Merge Algorithm Guide
| Algorithm | Best For | Notes |
|---|---|---|
| OpenCV Panorama Stitcher | Mobile panorama-style photos and handheld overlapping scenes | Good first choice for photos with perspective changes. |
| OpenCV Scan Stitcher | Flat scans and document sections | Good first choice for A3/A4 scanner workflows. |
| Feature Homography | Ordered images with strong visual features | Uses feature matching and perspective warping. Works best with text, corners, marks, or visual texture. |
| ECC Alignment | Similar images that need fine affine alignment | Can be slower on large images. Use when feature matching struggles but overlap is clear. |
| Template Match Blend | Flat scans with shared patches | Useful when a visible common region exists but feature detection is weak. |
| Translation Blend | Mostly flat images with simple left/right/up/down offset | Fast option for scanner sections with little rotation or perspective change. |
| Grid Contact Sheet | Non-overlapping images or failure fallback | Does not stitch; places images into a clean grid. |
Missing-Pixel Fill
Missing-pixel fill is optional and should be enabled only after previewing the merge result. It is useful when alignment creates black/empty areas around the merged image.
| Fill Algorithm | Best For | Notes |
|---|---|---|
| Content Fill Telea | Small to medium gaps | Fast OpenCV inpaint method and usually the first option to try. |
| Content Fill Navier-Stokes | Smooth image regions | Can produce smoother fills in gradients or soft backgrounds. |
| Edge Diffusion Fill | Large border gaps | Copies nearby edge content into gaps. It can be more expensive on very large output images. |
Output Files
- Default output name:
PhotoMerger_YYYYMMDD_HHMMSS. - Default output format: same format as the first input image.
- Supported image extensions:
.jpg,.jpeg,.png,.bmp,.tif,.tiff,.webp. - The user can manually choose another export format before saving.
- Saving creates the output folder automatically if it does not already exist.
Setup
Create and activate a virtual environment if preferred:
python -m venv .venv
.\.venv\Scripts\Activate.ps1
Install dependencies:
pip install -r requirements.txt
Run the app:
python -m photomerger
If python is not on PATH, use the Python executable shown by your installation or IDE.
CPU And OpenCV Notes
PhotoMerger configures OpenCV to use CPU processing and available CPU threads where OpenCV supports it. This is intentional for stability on Windows systems where OpenCV GPU/OpenCL acceleration can crash or hang during panorama stitching.
Some algorithms naturally take longer than others:
- Fastest in many scan cases: Translation Blend or Template Match Blend.
- More robust but heavier: Feature Homography and ECC Alignment.
- OpenCV Stitcher modes can be slower on large photos, but are often best for panorama-style inputs.
- Missing-pixel fill adds extra processing after the merge.
Troubleshooting
PhotoMerger disables OpenCV OpenCL acceleration at startup because some Windows GPU drivers can crash or hang OpenCV’s panorama stitcher with CL_INVALID_COMMAND_QUEUE. Stitching runs on the CPU for stability.
If a merge fails:
- Confirm the images have a visible shared overlap.
- Try OpenCV Scan Stitcher for document scans.
- Try Feature Homography if the images contain strong details or text.
- Try Template Match Blend or Translation Blend for flat scanner-style images.
- Use Grid Contact Sheet when the images are related but do not overlap enough to stitch.
Packaging
For a standalone Windows executable:
pip install pyinstaller
python -m PyInstaller --noconsole --name PhotoMerger run_photomerger.py --onefile --icon=assets\photomerger.ico --add-data "assets\photomerger.ico;assets"
The app sets a Windows AppUserModelID and loads assets\photomerger.ico at runtime so the taskbar icon matches the EXE icon. If Windows keeps showing an old taskbar icon, unpin the app, delete the old build, rebuild, and pin the new EXE again.