Note
This article is a part of Arduino / ATmega328p Embedded C Firmware Programming Tutorial. Consider exploring the course home page for articles on similar topics.

Arduino Tutorial Embedded C Register Level Arduino Master Class
Also visit the Release Page for Register Level Embedded C Hardware Abstraction Library and Code for AVR.
Introduction
This tutorial will walk you through the process of configuring Atmel Studio such that you can directly Program Arduino from Atmel Studio. This will let you choose Professional grade IDE ie. Atmel Studio for your programs and still use a Maker / Prototyping Hardware ie. Arduino for Testing or Deployment.
To Flash Arduino from Atmel Studio, you need to install Arduino IDE and Drivers before. Please follow these steps to install if you haven’t.
https://www.arnabkumardas.com/platforms/atmel/how-to-install-arduino-ide-and-drivers/
What You Will Learn
- How to flash Arduino from Atmel Studio using bootloader?
- How to program Arduino UNO using COM Port from Atmel Studio?
- How to program Arduino NANO using COM Port from Atmel Studio?
- How to flash Arduino boards from Atmel Studio?
Configuration Steps
Time needed: 5 minutes
Configuration Steps for Atmel Studio for Flashing or Programming an Arduino Board
- Open Atmel Studio
Open your installed Atmel Studio IDE.

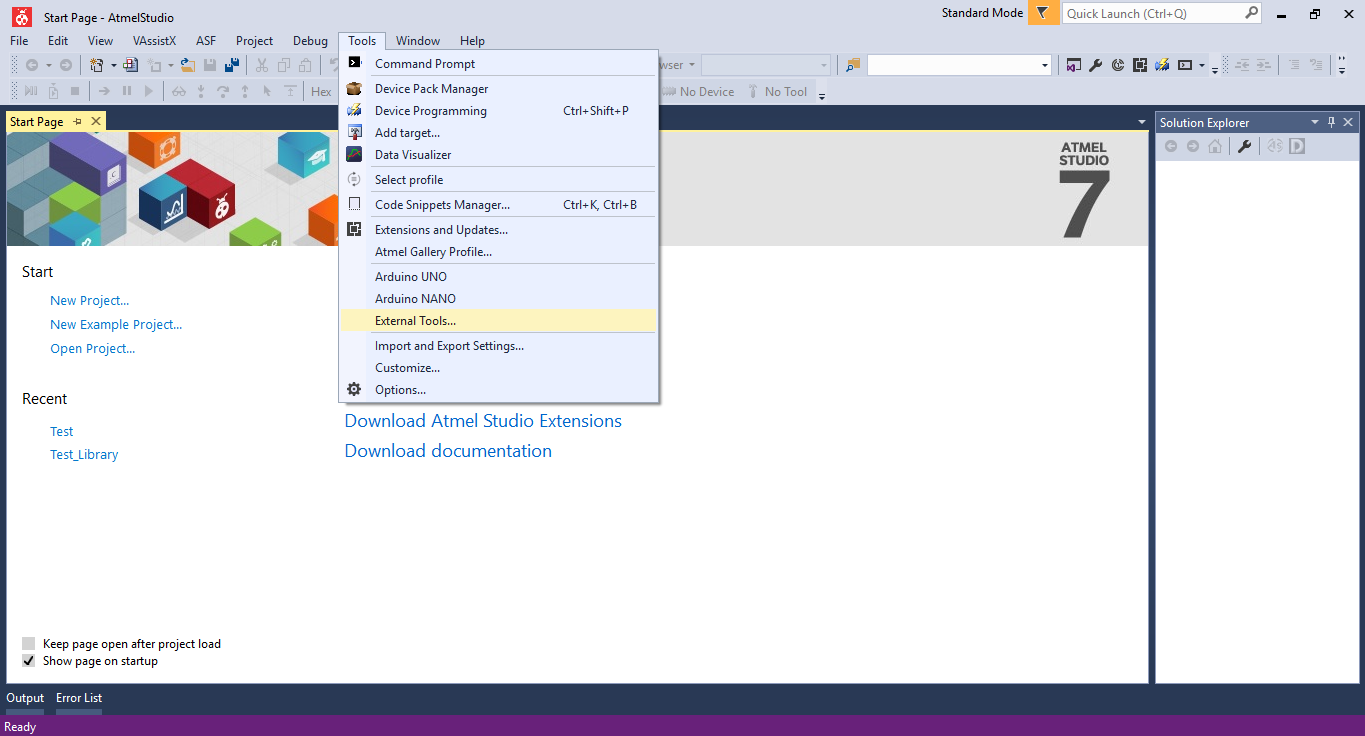
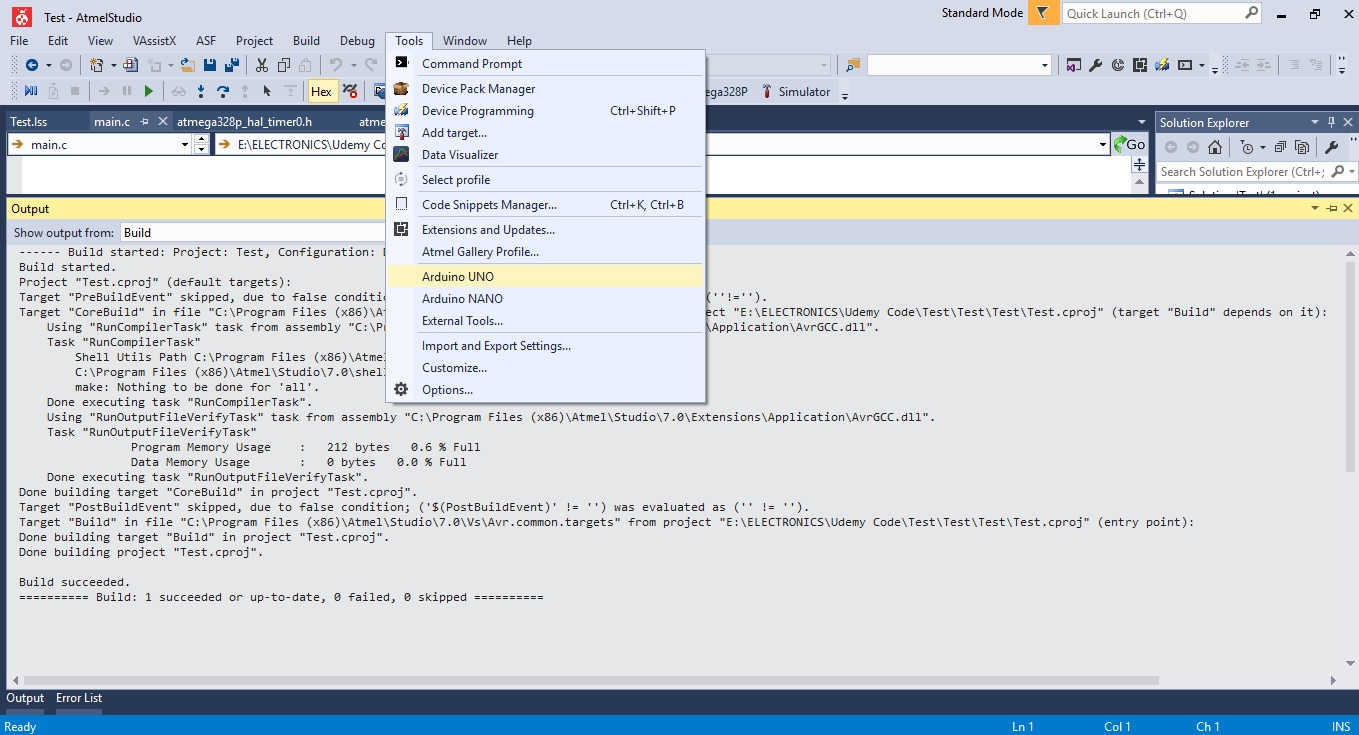
- Go to External Tools Menu
On the Menu Bar go to Tools -> External Tools

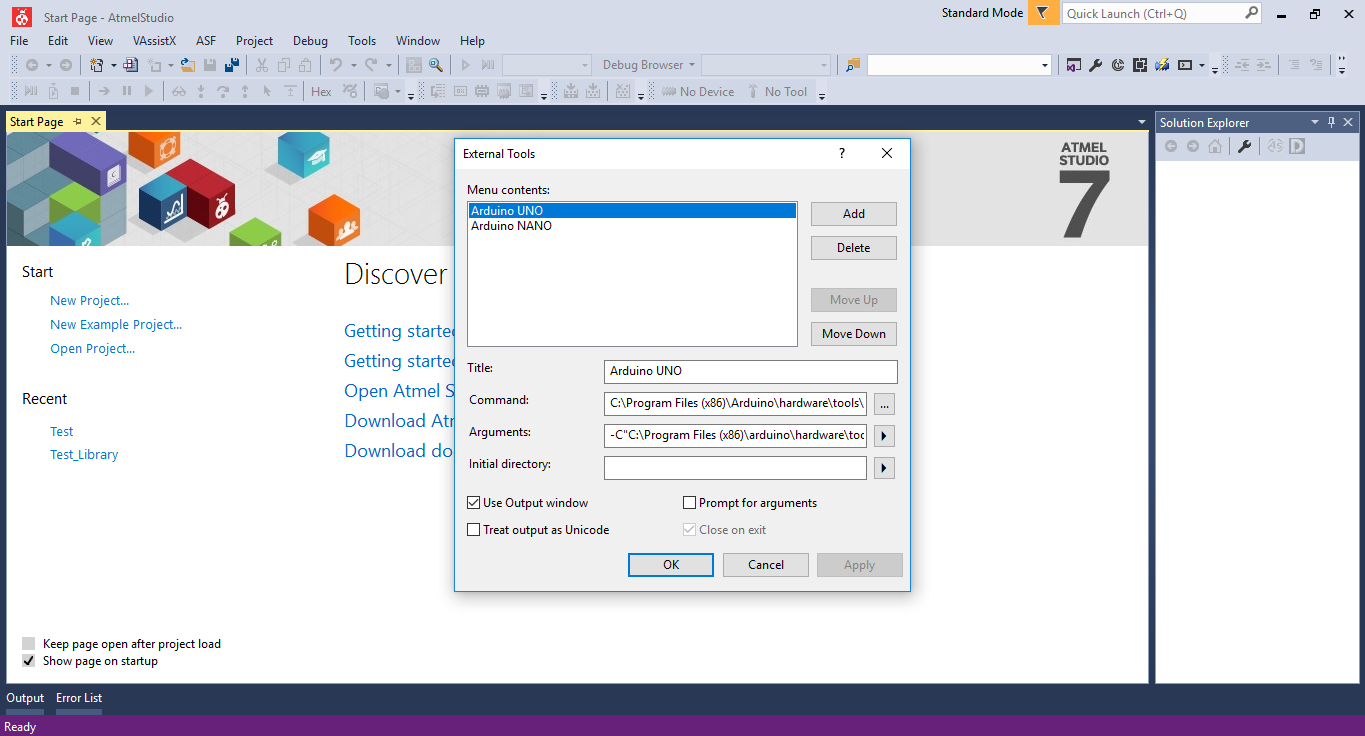
- External Tool Window
You should see a window like this but will be empty for you. I had already added two commands for Arduino UNO and Arduino NANO.
- Add a new Tool for Arduino UNO
Click ‘Add’ to add a new Tool. And fill the text boxes as below.
Title:Arduino UNO
Command:C:\Program Files (x86)\Arduino\hardware\tools\avr\bin\avrdude.exe
Arguments:-C"C:\Program Files (x86)\arduino\hardware\tools\avr\etc\avrdude.conf" -v -patmega328p -carduino -PCOM10 -b115200 -D -Uflash:w:"$(ProjectDir)Debug\$(TargetName).hex":i
Select'Use Output Window'
You can give any Title you want. The Command should have the path to avrdude.exe that will be in the location where you have installed the Arduino IDE. The Arguments should have the 3 most important parameters in it, the Microcontroller which is dependent on the Arduino board you are using, COM Port, and Baud Rate. COM Port system dependent and can be determined from Device Manager. Baud Rate should be 115200.
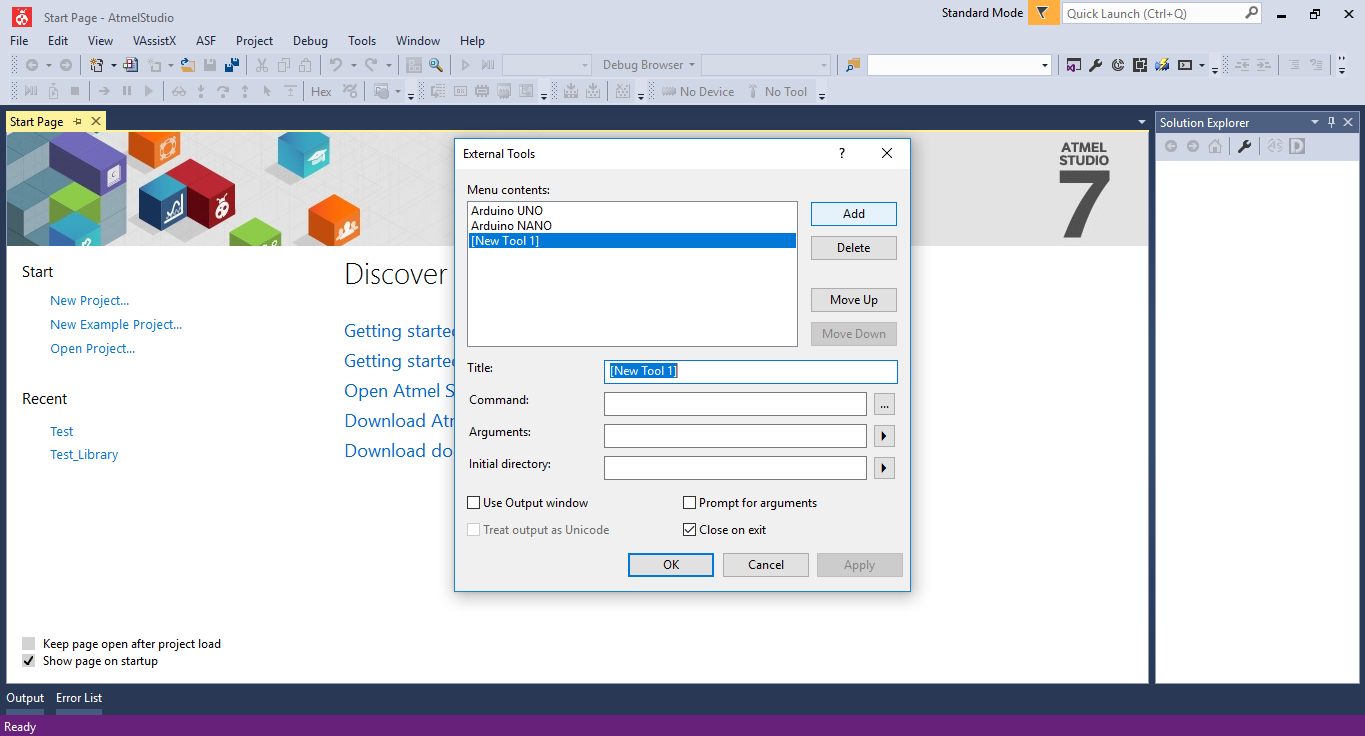
Arduino UNO / NANO Microcontroller >-patmega328pArduino MEGA Microcontroller >-patmega2560 - Add a new Tool for Arduino Nano
Click ‘Add’ to add a new Tool. And fill the text boxes as below.
Title:Arduino NANO
Command:C:\Program Files (x86)\Arduino\hardware\tools\avr\bin\avrdude.exe
Arguments:-C"C:\Program Files (x86)\arduino\hardware\tools\avr\etc\avrdude.conf" -v -patmega328p -carduino -PCOM5 -b57600 -D -Uflash:w:"$(ProjectDir)Debug\$(TargetName).hex":i
Select'Use Output Window'
You should notice that the microcontroller is the same as in Arduino UNO as both the board uses the same MCU. The COM Port is changed as every new board will get a new COM Port assigned by your PC. You have to check in Device Manager to which COM Port is assigned for your Board. The Baud Rate for Arduino NANO is 57600. - Build Your Program
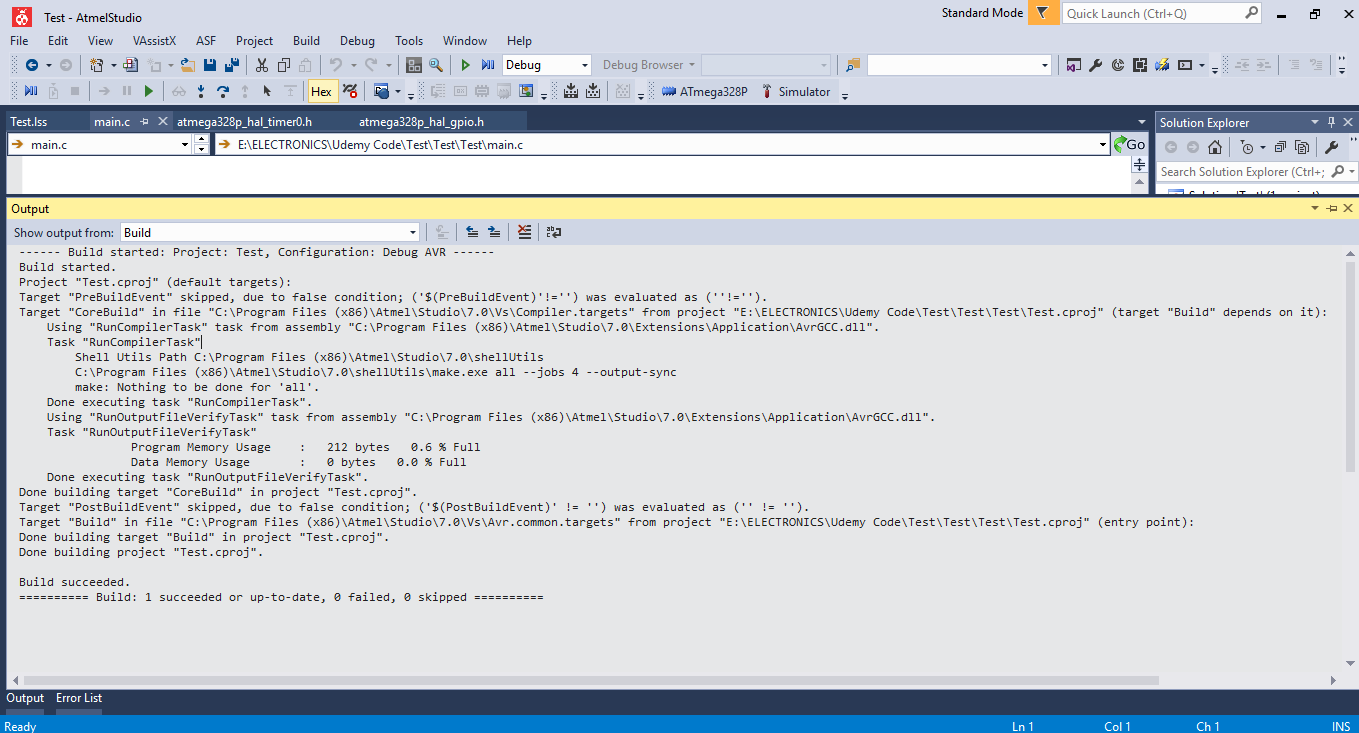
It usually takes few seconds to get the build done.

- Flash Arduino and Test
Go to Menu -> Tools and Select the Tool you want to Test.

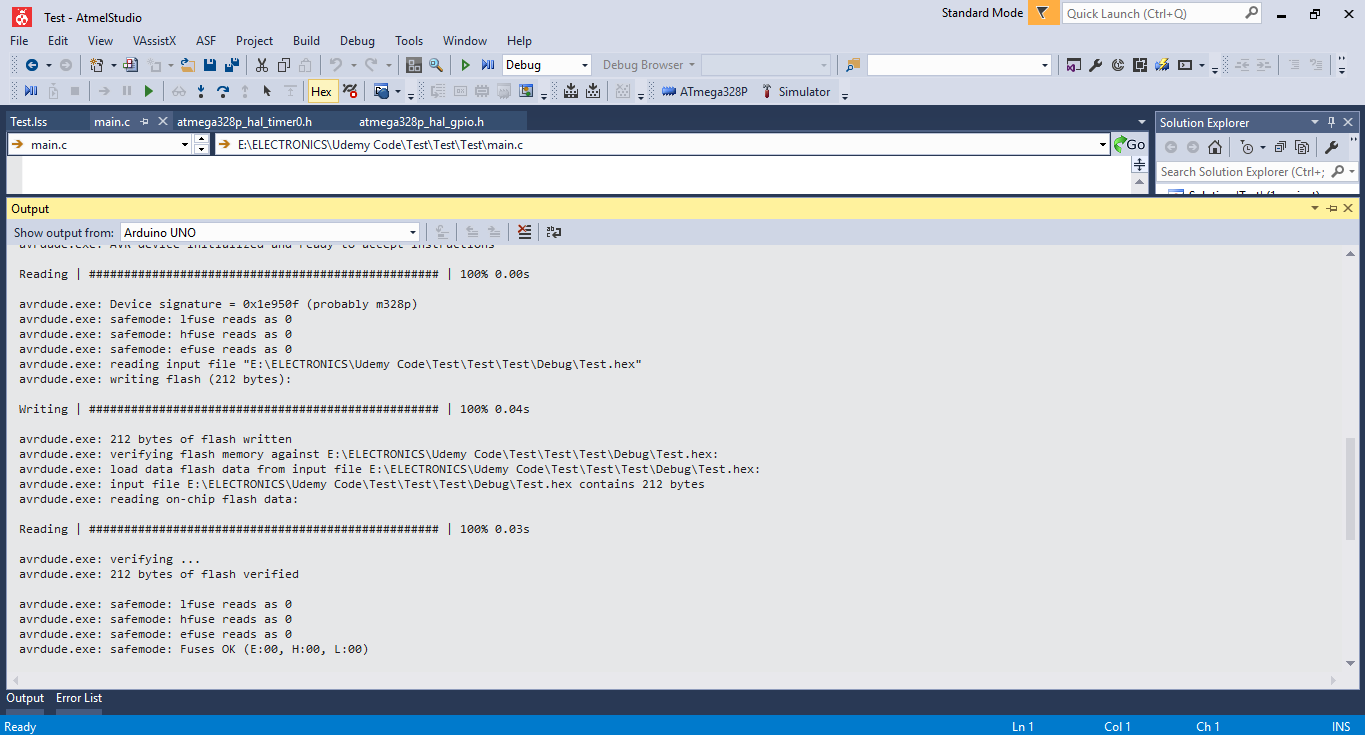
- If Everything is fine you should get a message like this
It usually takes few seconds to flash the Arduino.


23 Comments
Mosen · July 6, 2019 at 4:17 pm
Hello there.
Thanks. What about Arduino Mega?
Crazy Engineer · July 6, 2019 at 4:54 pm
Please Read the Tutorial Once Again. You will Find Required Information.
Kalachand das · March 25, 2020 at 1:56 am
How can I contact with you?
Crazy Engineer · March 25, 2020 at 12:08 pm
Write to me in my contact form.
yingnan cui · April 12, 2020 at 9:16 am
avrdude.exe: no programmer has been specified on the command line or the config file
Specify a programmer using the -c option and try again
Crazy Engineer · April 17, 2020 at 11:10 pm
Looks like the Drivers are not present or the configuration is not correct.
Neeraj · June 29, 2020 at 12:21 am
Can this fix avrdude not responding() error for arduino Uno?
Crazy Engineer · July 1, 2020 at 12:35 pm
You can give a try.
Arkapravo Mandal · August 22, 2020 at 6:26 pm
I tried but failed because the process was incomplete, sorry to say that but yes it was incomplete process. there are much more to do it before add external tool.
Crazy Engineer · August 22, 2020 at 6:33 pm
Hi,
Don’t hesitate to share the missing steps. Please share them in a comment below. Other readers will be benefitted.
Brandon Swanson · September 11, 2020 at 7:15 pm
Mega2560- When i follow the steps to flash i get the following error. Any ideas? Name has been changed as well as comport to match.
avrdude.exe: stk500_recv(): programmer is not responding
avrdude.exe: stk500_getsync() attempt 1 of 10: not in sync: resp=0x22
Crazy Engineer · September 17, 2020 at 10:53 pm
Either the Pin Connection / Wiring is Wrong or the Device is Locked or Damaged
Federico · February 11, 2021 at 4:30 am
Change -b argument to 115200 instead of 57600
Crazy Engineer · February 11, 2021 at 8:33 pm
It depends on the version of the bootloader, so both the baud rate is correct
Miha_m · October 5, 2021 at 2:01 pm
The line pulled out from Arduino IDE. Everything works.
-C”C:\Program Files (x86)\Arduino\hardware\tools\avr/etc/avrdude.conf” -v -patmega2560 -cwiring -PCOM2 -b115200 -D -Uflash:w:”$(ProjectDir)Debug\$(TargetName).hex”:i
AmDek · November 30, 2021 at 2:12 pm
Thanks for the good guide!
One question about the flashing process for Nano (and other boards as well) – Do you need the AVRISP mkll to flash the chip? Or is it through the USB port on the Nano?
Crazy Engineer · November 30, 2021 at 9:54 pm
Use the USB connection.
daniel · December 16, 2021 at 9:50 pm
Sir this is an amazing guide and I just wanted to ask when it would be finished cause I’ve spent a while now looking for guides as detailed as this but I couldn’t find any
Ben · February 3, 2022 at 8:48 am
For those struggling to find the Tools > External Tools menu item, you may need to got to Tools Menu > Select Profile and select advanced.